
Admin Guide
Complete reference for EatDrinkPlay site administrators - managing users, venues, content, settings, and the EatDrinkPlay's editorial and business workflows.
/wp-admin using your admin
credentials.
Dashboard Overview
The WordPress Admin Dashboard is the central control panel for
EatDrinkPlay. Access it by navigating to /wp-admin and
logging in with your administrator account.
Dashboard Widgets
| Widget | Purpose |
|---|---|
| At a Glance | Quick count of posts, pages, venues, events, and user counts |
| Activity | Recently published and scheduled content |
| Quick Draft | Create a new draft post directly from the dashboard |
| WordPress Events & News | Official WordPress community updates |
Left Sidebar Navigation
The admin sidebar provides access to all content management areas:
- Posts - Blog posts and articles (Sydney/Melbourne specific)
- Media - Image and file library
- Pages - Static pages (About, Contact, etc.)
- Comments - Reader comments moderation
- Venues - Venue listing management (base_venue CPT)
- Events - What's On event management
- Appearance - Menus, Widgets, Theme Customizer
- Plugins - Installed plugin management
- Users - User account management
- Settings - Site configuration
User Management
Manage all registered users from WordPress Admin → Users → All Users.
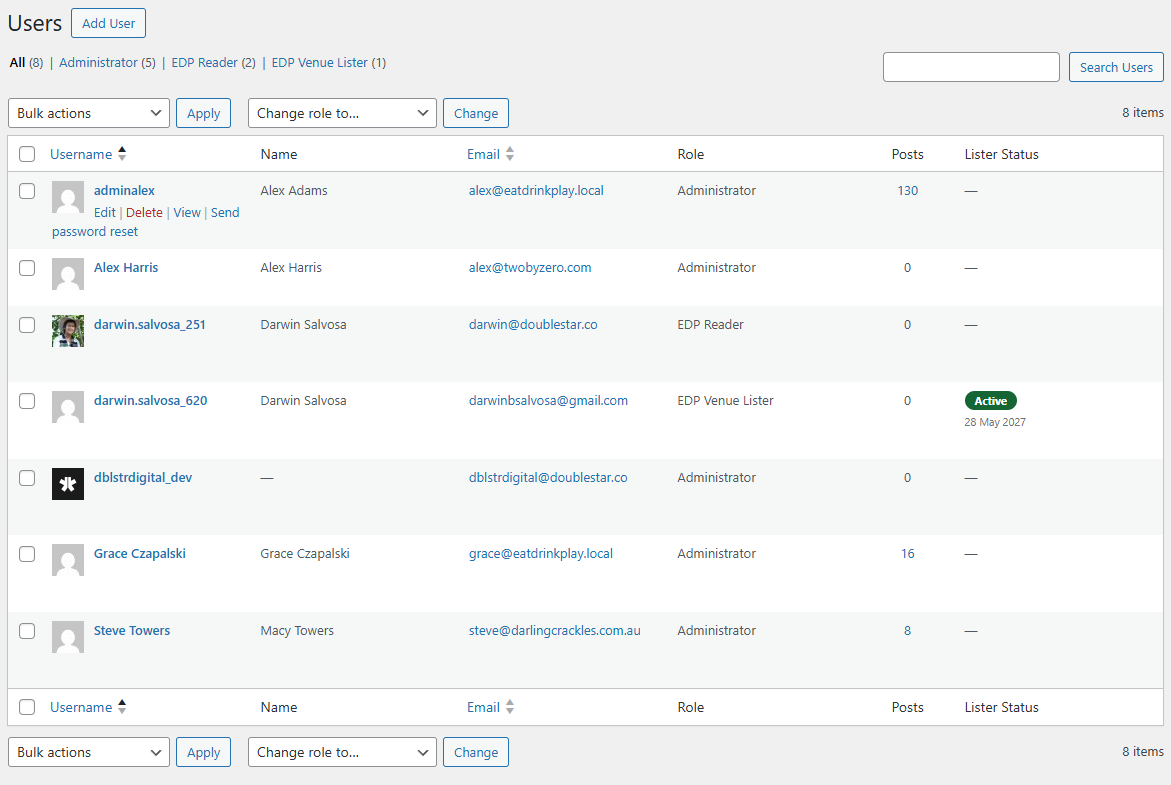
Approving a Venue Lister
When a new DP Venue Lister completes registration, email verification, and payment, their account enters review_pending status. An admin must approve them before they can publish listings.
-
Navigate to Users
Go to WordPress Admin → Users → All Users. Filter by role DP Venue Lister to see pending listers.
-
Identify Pending Listers
Listers awaiting approval will have their
edp_lister_statusmeta set toreview_pending. Look for users who registered recently. -
Review the Lister's Profile
Click Edit on the user to view their details - name, email, and business information.
-
Update Lister Status
Scroll to the custom fields section. Change the Lister Status field from
review_pendingtoactive(approve) orrejected(reject). Save the user profile. -
Notify the Lister
Send a notification email to inform the lister of approval or rejection with next steps. Inferred
Lister Status Values
| Status | Meaning | Admin Action |
|---|---|---|
| email_pending | Registered but hasn't verified email | No action needed; user must verify |
| review_pending | Payment complete, awaiting admin approval | Review and approve/reject |
| active | Fully approved, can publish listings | Monitor subscription expiry |
| rejected | Application rejected | Communicate reason to user |
| expired | Subscription expired | Prompt renewal or deactivate listings |
Managing EDP Readers
Reader accounts are created automatically upon registration and require no approval. Admins can:
- View all readers at Users → All Users filtered by role EDP Reader
- Edit reader profiles (name, email)
- Reset passwords on behalf of users
- Delete accounts if required
-
View the
edp_saved_venuesmeta to see their saved venues Inferred
Roles & Permissions Reference
| Capability | Admin | EDP Reader | DP Venue Lister |
|---|---|---|---|
| Access WordPress Admin | ✅ | ❌ | ❌ |
| Manage all venues | ✅ | ❌ | ❌ |
| Create/edit own venues | ✅ | ❌ | ✅ (when active) |
| Upload media | ✅ | ❌ | ✅ |
| Access Member Dashboard | N/A | ✅ | ✅ |
| Save wishlists | N/A | ✅ | ✅ |
| Manage all users | ✅ | ❌ | ❌ |
| View Offers & Perks | ✅ | ✅ | ✅ |
| Manage site settings | ✅ | ❌ | ❌ |
| Install plugins | ✅ | ❌ | ❌ |
Venue Management
Venues are the core content type of EatDrinkPlay. They are managed via the Venues custom post type in WordPress Admin.
Location: WordPress Admin → Venues
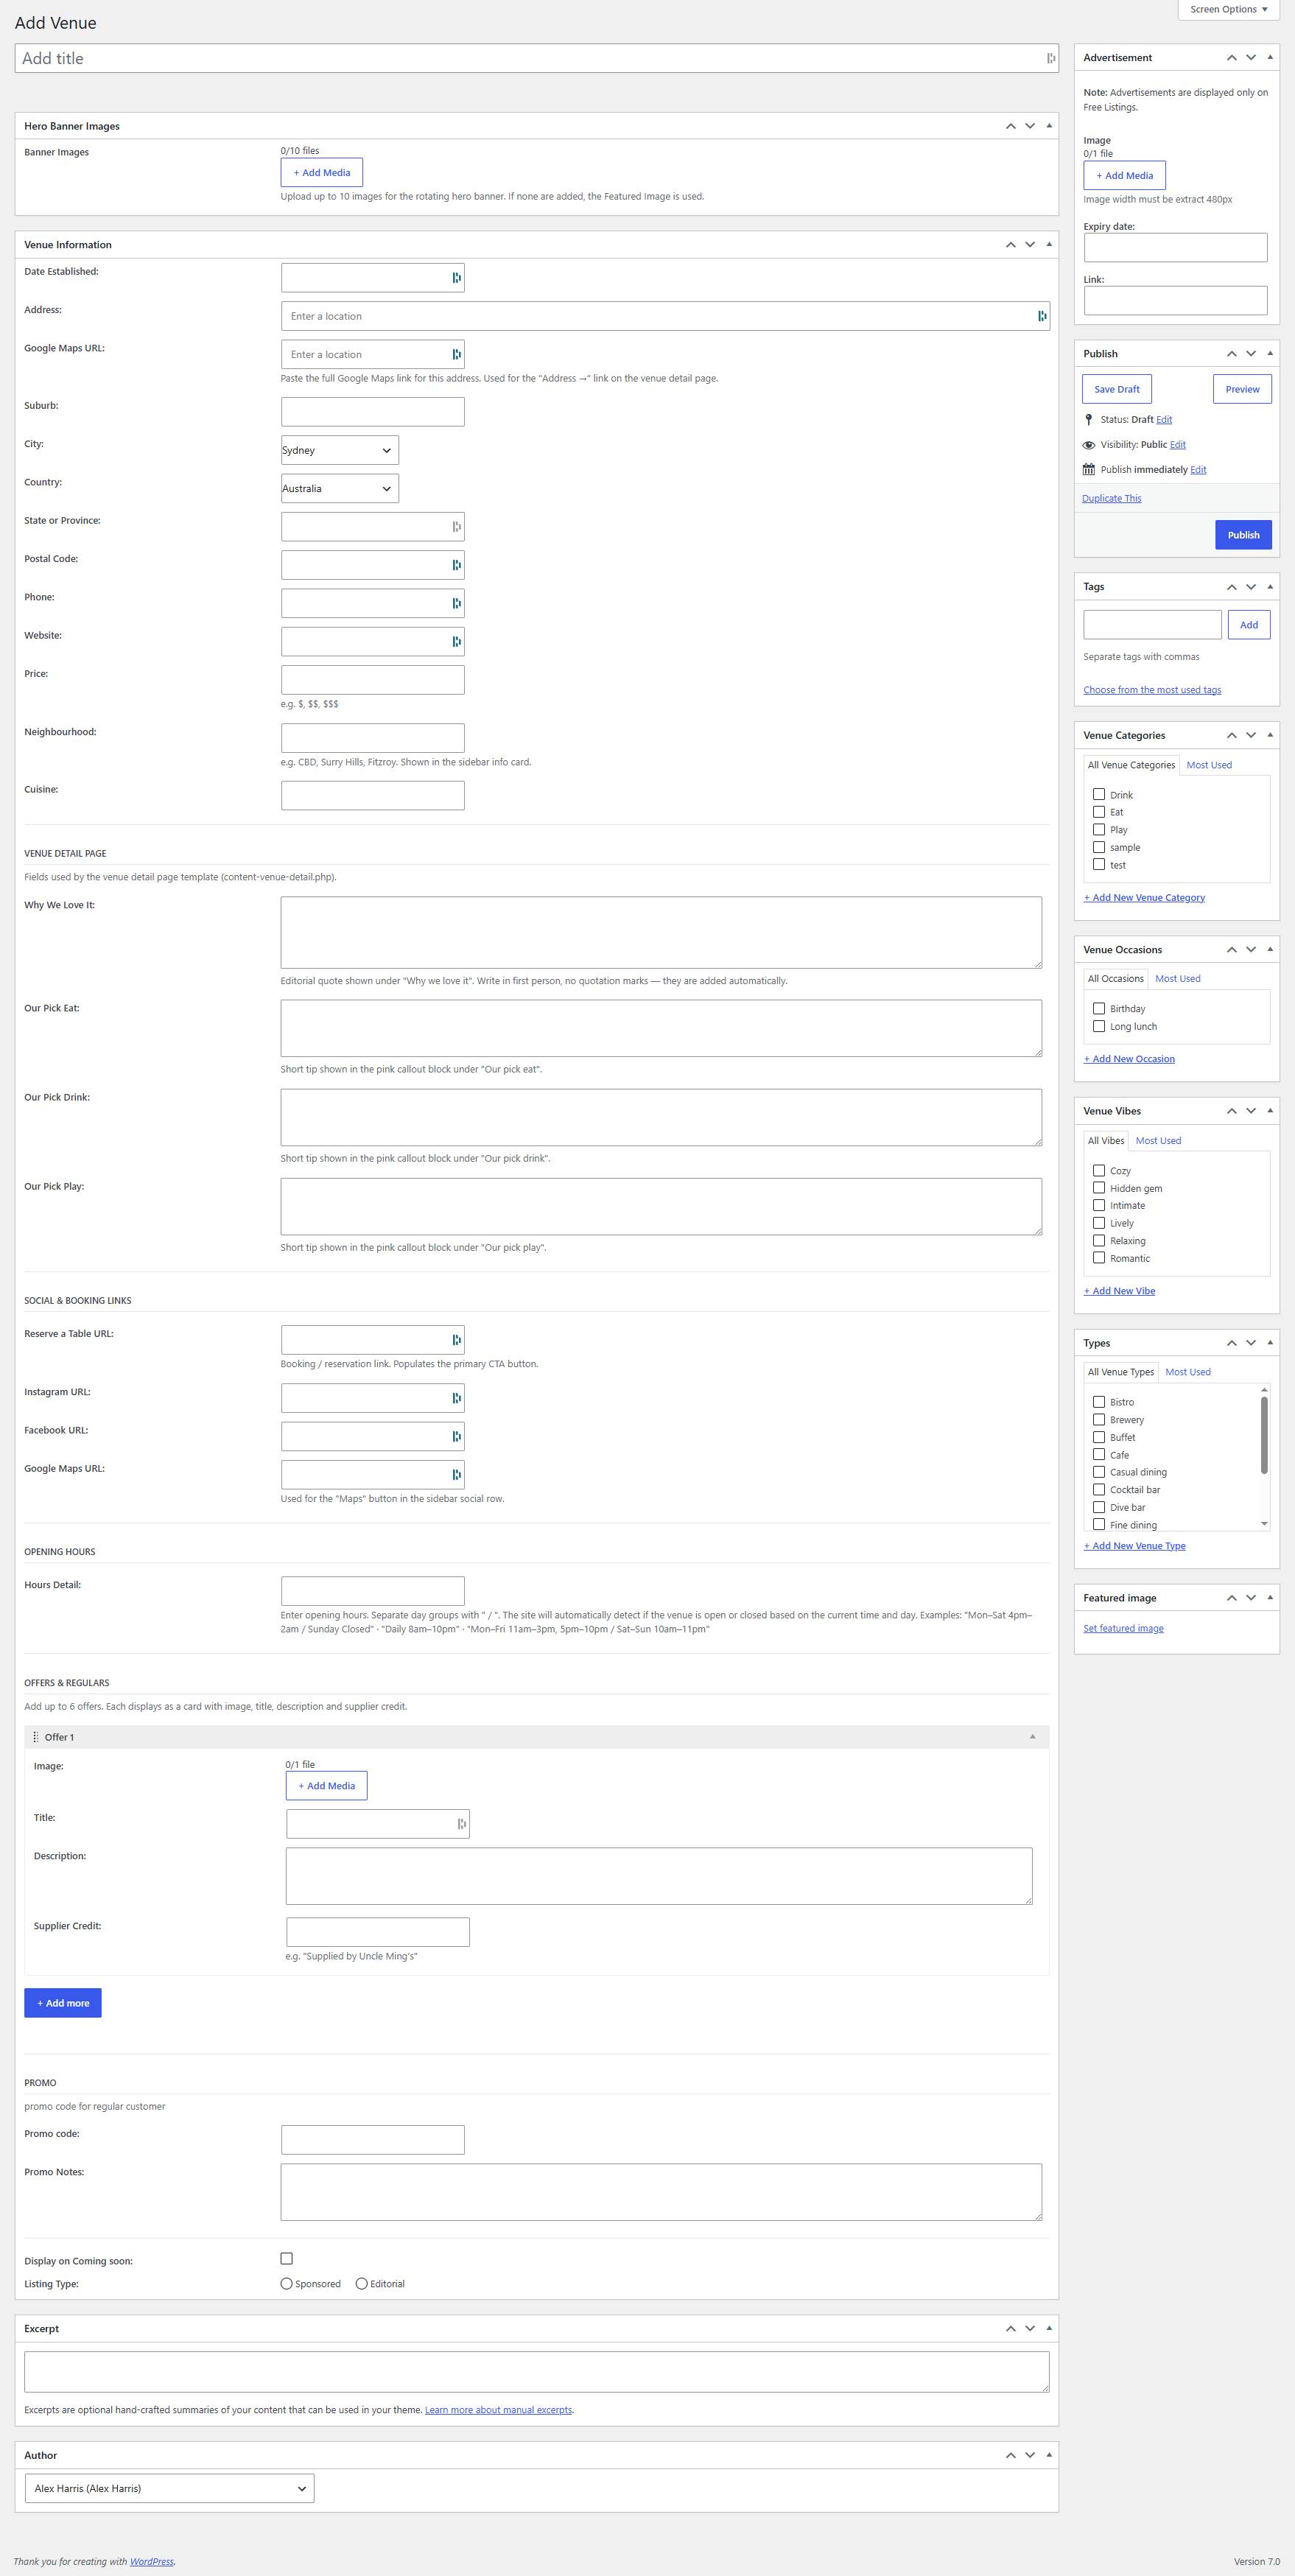
Creating a New Venue
-
Navigate to Venues
Go to WordPress Admin → Venues → Add New.
-
Enter Venue Title
Type the venue's full name in the title field at the top of the editor.
-
Write Description
Use the block editor or Classic Editor to write the venue description. Include the editorial "why we love it" narrative.
-
Set Featured Image
Click Set featured image in the right sidebar and upload or select the hero image for the venue.
-
Assign Taxonomies
In the right sidebar, assign the venue to the relevant Venue Category (e.g., Eat, Drink, Play), Venue Type (e.g., Cocktail Bar), Occasion, and Vibe tags.
-
Fill In Meta Fields
Scroll down to the MetaBox panels and complete all venue details (address, suburb, city, phone, website, hours, social links, etc.). See Venue Meta Fields for the full reference.
-
Upload Banner Gallery
In the Banner Images metabox, upload up to 10 photos for the venue detail page gallery carousel.
-
Publish
Click Publish to make the venue live, or Save Draft to save for later. Use Preview to check appearance before publishing.
Editing a Venue
-
Find the Venue
Go to Venues → All Venues. Use the search bar or filter by city, status, or category to locate the venue.
-
Open the Editor
Click the venue name or hover and click Edit to open the venue editor.
-
Make Changes
Update any fields - text, meta, images, categories - as required.
-
Update
Click the Update button to save changes. Changes are live immediately.
Venue Meta Fields Reference
Venue metadata is stored using the MetaBox plugin. The following fields are available in the venue editor:
Core Details
| Field | Description | Required |
|---|---|---|
| Address | Street address of the venue | Yes |
| Address URL | Google Maps link for directions | Recommended |
| Suburb | Suburb or area (e.g., Surry Hills, Fitzroy) | Yes |
| City | Sydney or Melbourne | Yes |
| State | NSW or VIC | Yes |
| Postcode | Australian postcode | Recommended |
| Phone | Contact phone number | Optional |
| Website | Venue's official website URL | Recommended |
| Price Range | $ / $$ / $$$ / $$$$ price indicator | Recommended |
| Cuisine | Cuisine type (for Eat venues) | Optional |
| Neighbourhood | Editorial neighbourhood label | Optional |
Editorial Fields
| Field | Description |
|---|---|
| Featured | Mark venue as featured (shows badge on listings) |
| Why We Love It | Short editorial quote/teaser shown on listing cards |
| Our Pick - Eat | Recommended food item or dish |
| Our Pick - Drink | Recommended drink or cocktail |
| Our Pick - Play | Recommended activity or experience |
| Listing Type | Sponsored or Editorial (affects display badge) |
| Show on What's On | Tick to feature this venue in the What's On weekly section |
| Coming Soon | Mark as coming soon (shows special badge, hides details) |
Social & Booking
| Field | Description |
|---|---|
| Reserve URL | Online reservation / booking link (e.g., OpenTable, Resy) |
| Instagram URL | Venue's Instagram profile URL |
| Facebook URL | Venue's Facebook page URL |
| Maps URL | Direct Google Maps link (if different from Address URL) |
Hours & Opening Times
Opening hours are entered in the Hours Detail field using a specific text format. The system parses this to display open/closed status in real time.
Mon–Fri 12pm–3pm, 6pm–10pm / Sat–Sun 12pm–11pm / Tuesday
                Closed
Use
/ to separate days. Use – (en dash)
between day ranges and time ranges. Closing day uses the word
"Closed".
Offers
Up to 6 promotional offers can be attached to a venue. Each offer includes:
- Image - Offer thumbnail
- Title - Offer headline
- Description - Offer details / terms
- Supplier - Partner or supplier name
Advertisement Unit
Each venue listing can carry one advertisement unit. The ad is displayed only on Free Listings (not Sponsored or Editorial listings). It appears as a banner-style block within the venue detail page and is managed directly from the venue's WordPress admin edit screen.
Where to find it
- Go to WordPress Admin → Venues.
- Open (or create) the venue you want to advertise on.
- Scroll down to the Advertisement Unit meta box (below the main content editor).
Fields
| Field | Type | Description |
|---|---|---|
| Image | Image upload (max 1) | The advertisement banner image. Must be exactly 480 px wide. Height is flexible but a landscape ratio (e.g. 480 × 160 or 480 × 240) works best. Upload via the media library - only one image is accepted. |
| Expiry Date | Date & time picker | The date and time when the advertisement stops showing. Once this moment passes the ad is automatically hidden on the front end - no manual action is needed. Leave blank to run the ad indefinitely. |
| Link | Text (URL) |
The destination URL the ad clicks through to (e.g. the
advertiser's website or a booking page). Enter the full URL
including https://.
|
How to add or update an advertisement
-
Open the venue in the WordPress admin editor (Admin → Venues → edit the venue).
-
Scroll to the Advertisement Unit meta box and click Add Media under the Image field. Select or upload an image that is exactly 480 px wide.
-
Click the Expiry Date field and pick the date and time the ad should stop running. The time defaults to midnight if left unchanged - adjust it if needed.
-
Paste the advertiser's destination URL into the Link field (must start with
https://). -
Click Update to save the venue. The ad is now live on the Free Listing page.
How expiry works
The expiry date is compared against the current server time on every page load. When the current time is past the stored expiry timestamp the advertisement block is not rendered - there is no cron job or manual step required. The image, link, and expiry value remain saved in the database so the ad can be re-activated by simply updating the expiry date to a future time.
Removing an advertisement
To remove an ad immediately, either:
- Set the Expiry Date to a past date/time and click Update, or
- Delete the image from the Image field and click Update - no image means no ad is displayed.
Gallery & Images
Each venue supports two image areas:
| Image Type | Field Name | Max Images | Usage |
|---|---|---|---|
| Banner Gallery | Banner Images | 10 | Hero carousel on venue detail page |
| General Gallery | Gallery Images | 5 | Additional image gallery |
| Featured Image | WordPress Feature Image | 1 | Thumbnail on listing cards, OG image |
Event Management
Events power the What's On section of the site. Manage events at WordPress Admin → Events.
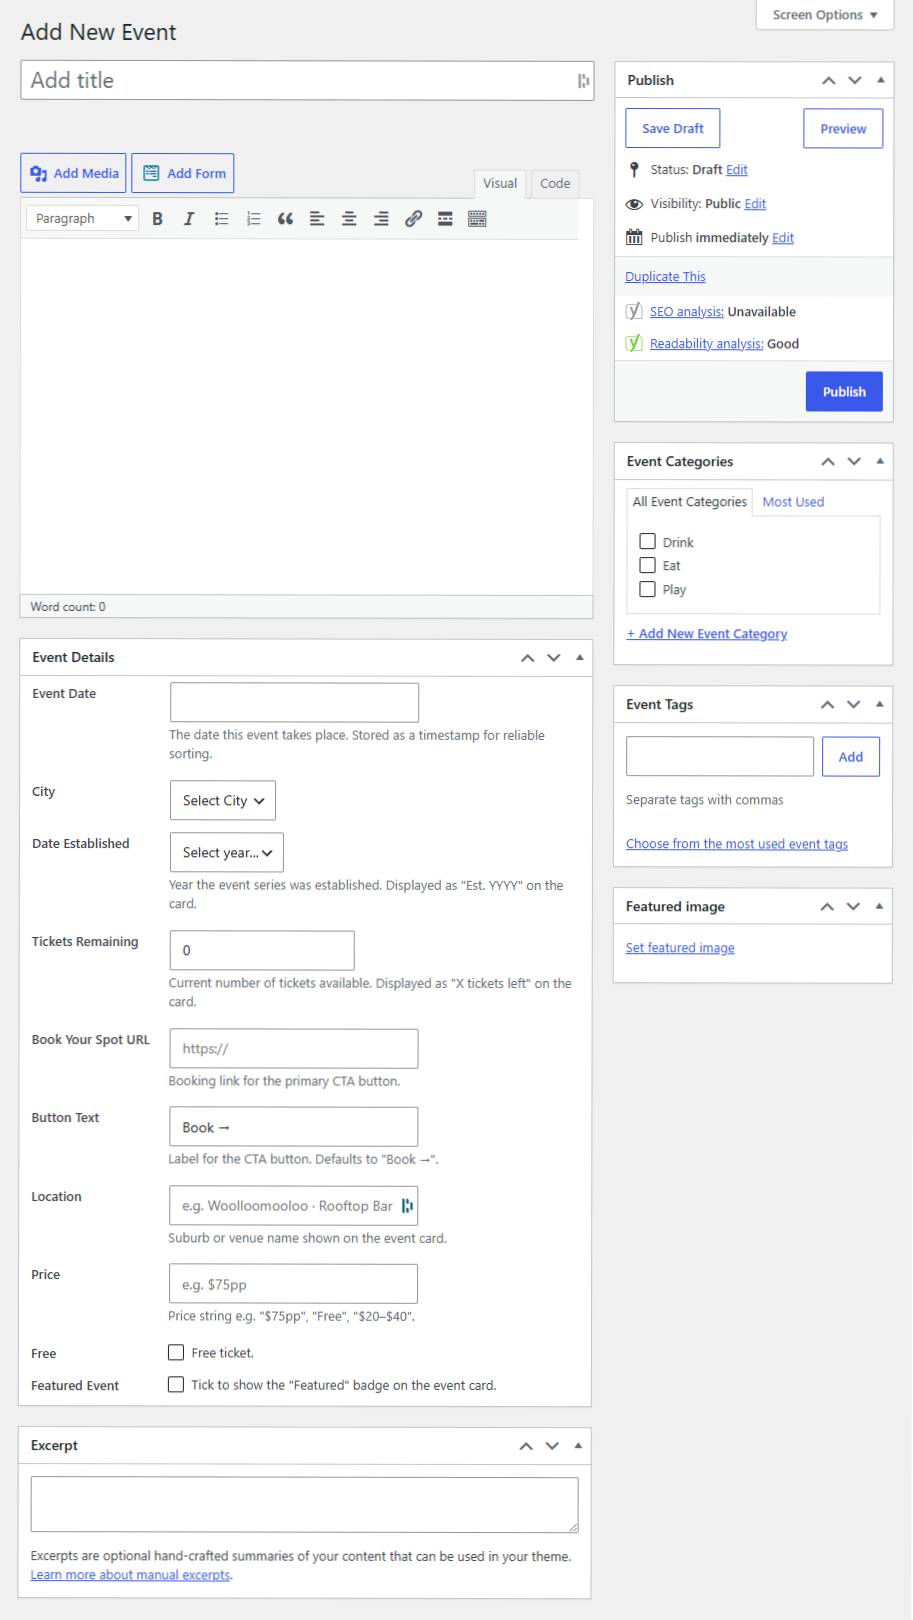
Creating an Event
-
Go to Events → Add New
Navigate to WordPress Admin → Events → Add New.
-
Enter Event Title & Description
Write an engaging title and a full description of the event in the editor.
-
Fill In Event Meta
Complete the event meta fields: Date, City, Location, Price, Booking URL, Button Text, Free checkbox, Featured checkbox, Tickets Remaining.
-
Set Featured Image & Categories
Upload a featured image and assign to the relevant event category and tags.
-
Publish
Publish to make it live on the What's On page.
Event Meta Fields
| Field | Description |
|---|---|
| Event Date | Date and time of the event |
| City | Sydney or Melbourne |
| Location | Venue name or address |
| Price | Price string (e.g., "$35", "From $20") |
| Free | Checkbox - marks event as free, hides price |
| Booking URL | Link to book or buy tickets |
| Button Text | Label for booking button (default: "Book →") |
| Tickets Remaining | Number of available tickets |
| Featured | Marks event as featured on listings |
| Year Established | For recurring annual events |
When the event date expires, it will be automatically marked as draft and the event will be deactivated.
Categories & Taxonomies
EatDrinkPlay uses a rich taxonomy system to organise venues and events.
Location: WordPress Admin → Venues → [Taxonomy Name]
Venue Taxonomies
| Taxonomy | Type | Examples |
|---|---|---|
| Venue Category | Hierarchical | Eat, Drink, Play |
| Venue Type | Flat tags | Cocktail Bar, Wine Bar, Pub, Restaurant |
| Occasion | Flat tags | Date Night, After Work, Groups, Solo |
| Vibe | Flat tags | Hidden Gem, Intimate, Casual, Upscale |
Adding a New Venue Category
-
Navigate to Venue Categories
Go to WordPress Admin → Venues → Venue Categories.
-
Enter Category Details
Fill in the Name, Slug, Parent Category (if a subcategory), and Description.
-
Set Category Icon
Each venue category supports a custom Icon field (Font Awesome icon class or SVG). This appears in navigation and filter bars.
-
Add New Category
Click Add New Category to save.
Content Management
Posts & Articles
Blog posts and editorial articles are managed via WordPress Admin → Posts. Posts are city-specific and can be tagged with a linked venue.
Post Types (City-Specific)
| Post Type | City | Purpose |
|---|---|---|
| Sydney Posts (base_sydney) | Sydney | Sydney editorial articles, reviews, guides |
| Melbourne Posts (base_melbourne) | Melbourne | Melbourne editorial articles, reviews, guides |
Linking a Post to a Venue
In the post editor, scroll to the Venue Link metabox. Type the venue name in the autocomplete field to link the post to a venue. This enables the "View Venue" link on the article.
Essential Guides
Guides are editorial content accessed via What's On → Essential Guides on the front end. They are created as regular Posts with specific categories assigned.
Homepage
New In Town
Frontend: Listings with an Established Date within the last 3 months (including today) will automatically appear in the New In Town section on the homepage.

Backend setting: Set the Established Date for the Venues

Essential Guide
Frontend: Listings Sydney post

Backend setting: Check Featured Post on Homepage

What's On

Backend setting: Check Select an End Date for event Display Expiration

Coming Soon
Frontend: Items will appear under "Coming Soon" if the current date is before their scheduled date. They will automatically be removed once the specified end date has passed.
Backend setting: Set the Established Date for the Venues
What's On
The What's On section aggregates Events and Venues flagged with Show on What's On. To feature a venue in this week's What's On:
- Edit the venue
- Tick Show on What's On in the venue metabox
- Update the venue
Navigation Menus
Location: WordPress Admin → Appearance → Menus
EatDrinkPlay uses three navigation menus:
| Menu Name | Location | Managed Via |
|---|---|---|
| Main Menu | Primary site navigation (top) | Appearance → Menus → Main Menu |
| Quick Menu | Utility navigation bar | Appearance → Menus → Secondary Menu |
| Footer Menu | Footer navigation links | Appearance → Menus → Footer Menu |
Editing the Main Menu
-
Open Menus
Go to Appearance → Menus and select Main Menu from the dropdown.
-
Add Menu Items
From the left panel, add Pages, Posts, Custom Links, Categories, or Venue Categories to the menu. Click Add to Menu.
-
Arrange & Nest
Drag items to reorder. Drag an item slightly to the right under another item to create a dropdown submenu. The mega menu template handles the display.
-
Save Menu
Click Save Menu.
Settings & Configuration
General Settings
Location: WordPress Admin → Settings → General
- Site Title and Tagline
- WordPress & Site Address URLs
- Admin Email
- Timezone (important for venue hours calculations)
- Date and Time formats
Payments & Stripe
Venue Lister subscriptions are processed via Stripe. Configuration is managed in the theme code.
Subscription Expiry
Subscription expiry is tracked via the
edp_lister_expiry user meta (Unix timestamp). A WP-Cron
job runs periodically to check for expired subscriptions and update
lister status to expired automatically.
Plugin Management
Location: WordPress Admin → Plugins
| Plugin | Purpose | Critical |
|---|---|---|
| Meta Box + Group | All custom metaboxes and fields for venues, events, team | Yes |
| Contact Form 7 | Contact page form handling | Yes |
| Yoast SEO | SEO meta, sitemap, breadcrumbs | Yes |
| Classic Editor | Legacy WordPress post editor interface | Recommended |
| Classic Widgets | Legacy WordPress widgets interface | Recommended |
| WonderPlugin Popup | Popup/modal functionality | Optional |
| Meta Box Geolocation | Geographic coordinate support for venues | Optional |
| Duplicate Page | Quickly duplicate posts/pages | Optional |
Permissions Reference
Summary of what each admin can configure and access:
| Area | How to Access | Notes |
|---|---|---|
| All Content | Posts, Venues, Events, Pages in WP Admin sidebar | Full read/write/delete |
| All Users | Users → All Users | Can edit roles, reset passwords, delete accounts |
| Site Settings | Settings menu | Full access |
| Theme Files | Appearance → Theme Editor (not recommended in production) | Use FTP/SSH or local dev instead |
| Plugin Management | Plugins → Installed Plugins | Activate/deactivate/delete |
| Database | Accessible via phpMyAdmin or Adminer in local environment | Handle with extreme care |
| File System | Via FTP, SSH, or local development environment | Required for theme/plugin code changes |